Transmitter - Model Setup
Previously we updated everything to do with the transmitter - in particular the transmitter OS called OpenTX. Then we disabled self-centering for the throttle. Now we'll finally go through the basic configuration for the transmitter. There are no end of transmitter settings you can adjust but we can ignore nearly all of them as they have sensible defaults or are irrelevant for our setup. We'll just set some basic things like time and date and create a model.
I'm not going to go into much detail about how to use the transmitter buttons like PAGE etc. to navigate around and change settings. The buttons have been covered previously and if you need more help on getting started with them, and how to use them to change settings etc., there's a section down below that includes links to videos that cover all this that you might want to look at first.
On this page we're just going to:
- Set date and time for the transmitter.
- Set its county code.
- Set the receiver channel order.
- Calibrate the sticks and pots.
- Create a new model.
- Set the model name.
- Set the model's failsafe setting.
- Set expo for pitch, roll and yaw.
- Invert the pitch.
Basic onfiguration
To get started long press MENU to get to the Radio setup screen and set the current date and time.
Set date and time.
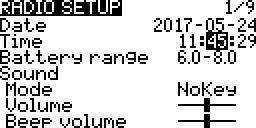
Then use the dial to navigate downwards and set the country code if necessary. It defaults to US, I set it to EU.
Set country code.
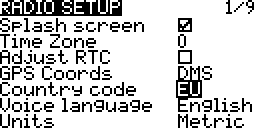
Aside: if you look through the OpenTX source code it seems that the only behavior that this country code value affects is binding for the XJT module used by all modern FrSKY transmitters (search for countryCode in pxx_arm.cpp - PXX is the protocol used with these modules).
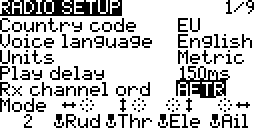
Now navigate down further to the bottom of the screen. The last two entries are Rx channel ord and Mode. We already covered mode when setting up the sticks - we're using mode 2, which is the default so leave this as it is. However we do have to change Rx channel ord to AETR (by default it's set to TAER). Channel order is explained in more detail later on.
Set RX channel order.
Then use PAGE to get to the Calibration screen and re-calibrate the sticks and pots (calibration was already been covered in more detail in the OpenTX intro). Remember to set the pots to their mid position before starting.
Calibration.

Models
A single transmitter can be used to control any number of remote controlled craft, e.g. you could have any number of quadcopters, along with some planes, cars and boats, and use the same transmitter to control whichever one of these you wanted to use at a particular time. On your transmitter you have to create models with each model corresponding to one of the RC craft you own.
Later we'll cover the binding process that ties a given model, that you've created, to the actual receiver on the corresponding craft.
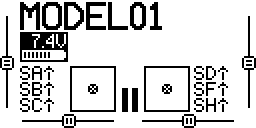
The transmitter comes with one model, called MODEL01, already set up - when you turn on the transmitter you can see on the main screen that it's the currently selected model.
Main screen before any setup.
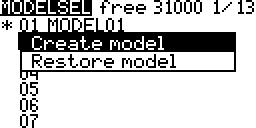
So let's create a new model corresponding to the Pixhawk based quadcopter that we're building. Make sure you're on the main screen (use EXIT to get back there if you're not) and then short press MENU to get to the Model selection screen. You can either modify the existing MODEL01 or create a completely new model. To create a new model turn the dial to select an empty slot, e.g. 02, and press ENTER and select Create model.
Create a new model.
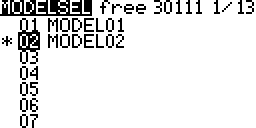
The new model is initially just called MODEL02, the asterisk beside it indicates that it's the currently selected model.
New model with default name.
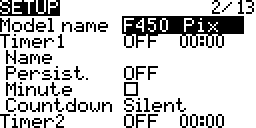
Now press PAGE and update the model name to something more informative, e.g. "F450 Pix". Long hold ENTER to get a capital letter.
Set model name.
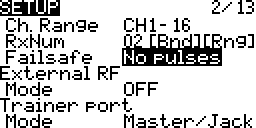
Use the dial to scroll through all the other options until you reach failsafe. Set it to No pulses, we'll come to what this means later.
No pulses failsafe.
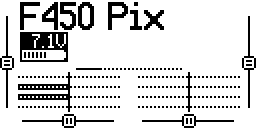
That's it - setup is done for the moment. If you return to the main screen you'll see that the name of the newly created (and currently selected) model is now shown.
Main screen with new model selected.
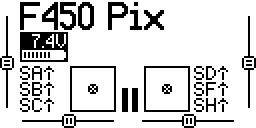
As you've already seen the main screen shows current switch states etc., if you're interested there's other data you can get to from the main screen - see main screen pages.
Receiver channel order
We looked at something called mode when we covered stick setup. The chosen mode affects which stick direction is considered to be throttle etc., e.g. up/down on the left stick is throttle in mode 2.
However there are two devices involved here - the transmitter and the receiver. The mode just affects the mapping between stick directions and names like Ail, Ele, Thr and Rud in the transmitter. So when you're in mode 2 and you move the left stick up and down this adjusts the value that the transmitter associates with throttle. The transmitter then has to transmit this value to the receiver.
As noted above the transmitter has 16 channels (using its internal RF module) on which it can output these values. Typically the stick values are transmitted on the first four channels, i.e. 1 to 4. But like mode it's just a convention how the receiver (and the related equipment - either a flight controller or directly connected servos) interprets the values it sees on these channels.
There are two main conventions for receivers. Many devices follow the convention established by the manufacturers Spektrum and JR where channel 1 is interpreted as the value for the throttle and so on like this:
| Channel # | Control |
|---|---|
| 1 | Throttle |
| 2 | Aileron |
| 3 | Elevator |
| 4 | Rudder |
The shorthand for this convention (for obvious reasons) is TAER.
Note: as discussed elsewhere the terms elevator, aileron and rudder tend to be popular among those piloting planes while the terms pitch, roll and yaw are more common among those piloting mutlicopters (and both groups use the term throttle). OpenTX always uses the plane naming convention in all its screens and menus.
As we saw above TAER is the default value for Rx channel ord. However many devices follow the Futaba and Hitec convention:
| Channel # | Control |
|---|---|
| 1 | Aileron |
| 2 | Elevator |
| 3 | Throttle |
| 4 | Rudder |
The shorthand for this convention is AETR. This is the convention that the setup we're building requires and so we changed the Rx channel ord.
When you create a new model the controls are initially mapped to channels according to the current value of Rx channel ord. If you go to the Mixer screen for your model you can see the current mapping between channels and controls.
Mixer screen.
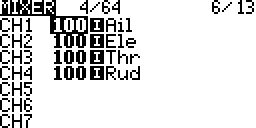
RX channel ord is a global setting, however its current value is only used to determine the initial channel order when creating a new model. Changing Rx channel ord won't affect any existing models. And you can modify the channel order of existing models independent of the current value of Rx channel ord (just go to the Mixer screen and rearrange the order there).
Note: there's an Input screen that superficially looks quite similar to the Mixer screen - however this screen is about adjusting the behavior of the various controls, e.g. adjusting expo (which we'll come to later) to make them less "twitchy". On this screen you can even adjust the real source for the values Thr etc. on this particular model. By default the stick considered throttle according to your current mode setting is mapped to Thr but you could e.g. map one of the pots to Thr for this particular model if you wanted.
Failsafe
Above we set failsafe to no pulses. Before we did this the transmitter would always warn that there was no failsafe set for the current model when the transmitter was turned on.
The failsafe setting determines what the receiver should do if it loses contact with the transmitter, e.g. if the drone flies too far away or the transmitter runs out of battery power. There are various options - including leaving the choice to the receiver (you then have to configure the actual failsafe behavior on the receiver). Other options include having the receiver continue to output the same values as when it lost contact (this presumably results in the situation getting worse in most circumstances, with the receiver telling the craft to maintain the course that caused it to fly out of range).
With a craft like ours the flight controller can respond intelligently to losing contact. So in this situation no pulses is the preferred option (see ArduPilot failsafe setup), this leave it up to the flight controller to decide what to do. It can e.g. be configured to return to the launch point or, if it's following a preconfigured route, to simply complete the route. We'll look at testing that the failsafe really works as expected when we set up the flight controller.
Expo
When you use the sticks for pitch, roll and yaw you're generally not making extreme movements so the sticks stays near the center in any given direction and you rarely move any stick to its maximum or minimum position. You end up just moving the sticks within a small area around their center position. So it would be nice if we could adjust things to stretch out this small central area so that small movements around the center result in less dramatic movements for the vehicle, making it easier to control and making it less "twitchy" when responding to the small movements we're typically making.
This is what expo is about - adjusting the responsiveness around the center of the sticks. Generally expo is just applied to pitch, roll and yaw while the throttle is left as it is - so for the left stick we're just talking about adjusting things for left/right stick movement, i.e. yaw, while for the right stick we're talking about both left/right and up/down stick movement, i.e. roll and pitch.
Painless360 has a nice video that explains expo far better than I could. And then in a separate video at 5:10 he explains how to set expo on the Q X7. That video covers all the details clearly within a minute - so rather than duplicate that I'll just summarize briefly here.
Inputs before adjustments.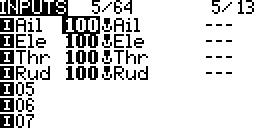 | AIL before adjustments.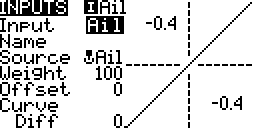 | AIL with expo of 25.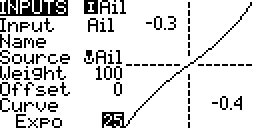 | Inputs after adjustments.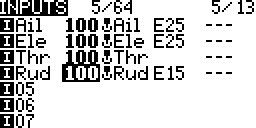 |
From the main screen short press the MENU button to get to the Model selection screen, then use the PAGE button until you get to the Inputs screen. Then in turn for Ail, Ele and Rud you press and hold ENTER and select Edit - on the edit screen for each you go down to Curve and change the default values their (Diff and 0) to Expo and the desired expo value. Suggested values are as follows:
| Control | Value |
|---|---|
| Ail | 25 |
| Ele | 25 |
| Rud | 15 |
These are just values that Painless360 consistently suggests in various videos and not ones I've come to by experimentation. As noted above throttle is left unadjusted.
Note: despite the name the function behind expo in OpenTX is not an exponential fuction - if you're interested take a look at mixer.cpp, there you'll find a large comment and the actual expou function that's used.
In both videos on setting expo Painless360 says that if you can you should set expo on the flight controller rather than the transmitter as this avoids a loss of resolution. This isn't too important and as it happens you can't do set expo like this with the flight controller software that we're using. However if you're interested by what he mean then see loss of resolution.
Inverting pitch
We'll be using the ArduCopter flight stack and one of its odd features is that you have to invert the pitch, i.e. the elevator in airplane-speak, otherwise the quadcopter will go forward when you pull the right stick back and go backward when you push it forward.
Go to the Outputs screen for your model, go down to CH2 (which is elevator), press ENTER, select Edit, go down to Direction and change the --- value shown to INV.
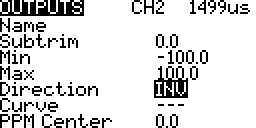
Afterwards you'll see on the Outputs screen that the little arrow for CH2 is pointing the opposite direction to all the other ones.
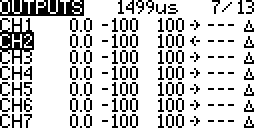
You can then see the affect of this by going to the main screen and then pressing PAGE. This brings you to the screen shown below - try moving the sticks about, up and down, left and right, and seeing how things react. Move the left stick, i.e. throttle, up and down and you'll see the value corresponding to channel 3 changing - as you'd expect its value is highest when you push it all the way up. Now move the right stick, i.e. pitch which we've just inverted, and you'll see how its value is instead at its lowest when it's pushed all the way up.
Notes:
- Having to invert the pitch is basically an ArduCopter bug though some people argue it's a matter of perception what's correct, see ArduPilot issue #935 and this DIY Drones thread.
- This is one of the few situations where Painless360 gets things wrong - in more than one of his videos he discusses inverting pitch via the Inputs screen but this just inverts the stick and not the associated trim buttons.
TODO: verify the claim about trim - establish the craft at a stable fixed point and then use the roll trims to force the copter left and right, rather than using the roll stick, then try the same with the pitch trims and see that these trims affect going back and forward in the same way as the roll trims affect going left and right. Then unset INV in Outputs and instead set the Weight for Ele to -100 in Inputs and see if things behave differently.
TODO: see if pitch inversion is also required when using the PX4 flight stack and see if QGroundControl has any special handling for it.
Videos and tutorials
If you had any problem with the basic transmitter setup and model creation then this section contains some links to content that should make things clearer. While much of this content is not specific to our setup, e.g. covering planes rather than quadcopters, it's still helpful to see how to use OpenTX and interact with the transmitter.
Painless360 has two relevant videos:
- Tips for setting up a new radio - at 10:37 he sets date and time and later at 11:39 he goes through calibration.
- Creating basic model types - at 2:50 he creates and names a new model. Then he sets up expo (as already linked to above). Then he briefly covers the mixer (note that the channel order shown is different to that used with the Pixhawk). From 6:44 he goes into quadcopter specific setup but by 10:50 the content relevant to this build is over. After this point he sets up an arming switch (which isn't relevant for the Pixhawk as it uses a physical safety switch combined with stick based arming) and then he sets up a flight mode switch (we'll handle flight modes later using a different Painless360 video for reference where he sets things up specifically for the Pixhawk using OpenTX Companion rather than the transmitter).
The Flite Test team cover model creation at 16:50 in their Q X7 Setup and review video. Later they bind it (which we'll come to later) to a D4R-II receiver. Most of what they cover is plane specific.
Blue Falcon covers failsafes in his Q X7 - setting up failsafes video and at 5:28 he sets no pulses as we do here. Blue Falcon in fact has a whole playlist of videos covering the Q X7, that starts out with a basic introduction and works through pretty much every aspect of the transmitter, both its hardware and its software. There are better approaches for some things he covers, e.g. gimbal adjustment, but overall it at least makes you aware of pretty much everything one can do with the transmitter.
RCdiy has a detailed page, that's accompanied by a video, that covers similar content. He covers setting the mode for the sticks (in our case the default is already what we want), binding and setting the failsafe (he delegates the choice of action to the receiver).
Hanger Fifty one explains in this video why trying to invert the pitch via the Inputs screen is incorrect and he demonstrates setting it up, as we did above, via the Outputs screen. And RCdiy discusses changing control surface directions on one of his pages - this covers the same thing but he uses the term "inverting control surfaces" as he's talking about planes.